
Knowledge optimization is a crucial concern of any business trying to enhance. Server clustering gives redundancy and scalability, offering an environment friendly resolution to this concern.
A server cluster introduces redundancy and automated failover that protects from outages. Server cluster internet hosting ensures that an error in a single server doesn’t shut down your whole community. As a substitute, functionalities are instantly shifted to different servers within the cluster.
Server clustering will not be restricted to bodily servers, as you possibly can cluster your cloud servers. When working a clustered cloud server, you want a useful resource to handle your clusters, together with including and eradicating nodes effectively. You’ll be able to obtain this by way of OpenStack.
What’s OpenStack?
OpenStack is an open-source platform utilized for constructing and managing cloud platforms for private and non-private clouds through the use of pooled digital assets. OpenStack is an ordinary cloud computing platform deployed as an infrastructure service (IAAS) in private and non-private cloud environments the place all of the assets are made obtainable to the person.
Parts of OpenStack
There are 9 core elements in OpenStack.
- Nova: Nova is the first computing engine behind OpenStack. Nova is used for deploying and managing many digital machines and different cases wanted to handle the computing job.
- Look: Look is a element that gives the imaging service to OpenStack. There are photographs contained within the digital copies of a tough disk. Look permits these photographs for use because the template when putting in new digital machine cases.
- Swift: Swift is an object storage system storing objects and information.
- Cinder: Cinder is a element used for block storage. Cinder can find particular places on a disk drive.
- Keystone: Keystone operates the identification providers for OpenStack. This element gives all authentication mechanisms.
- Neutron: Neutron gives the networking functionality for OpenStack. Neutron helps to make sure that every OpenStack element can talk with the others shortly and effectively.
- Ceilometer: The ceilometer is a telemetry system that collects knowledge concerning the utilization of the OpenStack elements. The output knowledge can be utilized for billing particular person customers of the OpenStack providers.
- Warmth: That is the orchestration element of OpenStack. It permits builders to retailer the necessities of each cloud software in a file that defines what assets are required and what circumstances are essential to run the applying.
- Horizon: Horizon is the OpenStack dashboard. It’s a GUI that helps each person see which OpenStack elements are working. It additionally permits builders to observe the OpenStack atmosphere and outline which elements have to be managed.

The architectural design of the OpenStack platform reveals how every element connects.
OpenStack Set up
OpenStack requires working programs that help virtualization within the back-end because it can’t be put in on {hardware} instantly. Ubuntu(KVM), Redhat Enterprise Linux(KVM), Oracle Linux(Xen), Oracle Solaris(zones), Microsoft Hyper-v, and VMware ESXi are working programs that help the OpenStack cloud platform.
Earlier than putting in OpenStack, make sure you set up Ubuntu 18.04 on VMware after which allow virtualization. OpenStack requires massive RAM allocation. So guarantee you could have between 5 and 6 GB of RAM obtainable.
Step 1: Retrieve Put in Packages and Test Required Updates.
Step one is to retrieve the packages already put in on the system and examine for required updates. Use the beneath command to attain this:
> sudo apt-get replace
Step 2: Set up Out there Improve of All Packages
Achieved by way of the next code:
> sudo apt-get improveThe above command line installs all of the obtainable upgrades of all packages at present put in on the system from the sources configured by the record file. If required, the brand new packages might be put in to fulfill the dependencies. Nevertheless, current packages won’t be eliminated.
This step takes about 3-5 minutes to finish.
Step 3: Set up Git
After putting in all upgrades, the subsequent step is to put in git. The command line for that is:
> sudo apt-get set up git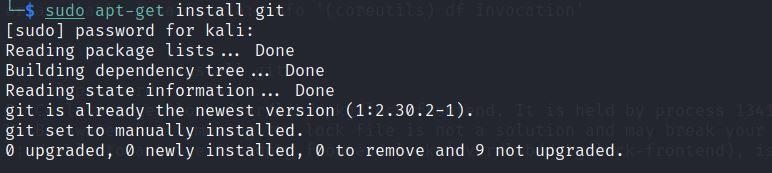
Git is an open-source distributed model management system that manages adjustments to supply code and documentation in OpenStack.
Step 4: Use Git to Clone Devstack’s git repository
After putting in git, you’ll use a git clone command to repeat the devstack git repository for putting in the packages on the OpenStack cloud. It will require the next command line:
> git clone https://opendev.org/openstack/devstack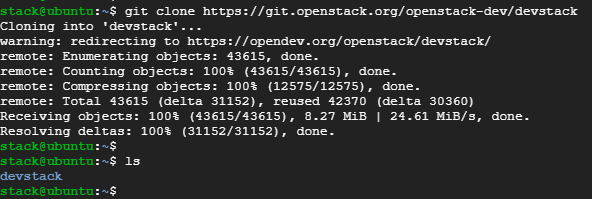
This command will clone the devstack git repository right into a devstack folder. The devstack repository comprises the script that installs Openstack and different templates required for its configuration.
Step 5: Entry Devstack Folder and Make Adjustments to Inc Python File
With out making particular adjustments to the inc python file within the devstack folder, you’ll doubtless encounter errors whereas putting in the OpenStack clone. This error happens due to the pip set up command. Kind in:
> cd devstack/locates the devstack folder
-/devstack$ gedit inc/pythonFind the next line while you enter the window
$cmd_pip $improve then change it to
$cmd_pip $improve $install_test_reqs --ignore-installed Save and shut the folder.
Including this command will assist keep away from any error messages when putting in Openstack.
Subsequent, find the samples folder by way of the command:
> cd sampleswithin the samples folder, you’re going to copy the native conf file through the next code;
-/devstack/samples$ cp native.conf ../

-/devstack/samples$ cd ..

-/devstack$ native.conf
this takes you to the native conf file the place you’ll make a number of adjustments, together with;
- your admin password
- database password and rabbit password
- Host IP and add floating vary
After making the adjustments, save the file and shut the web page.
Step 6: Begin Putting in OpenStack Cloud
Use the beneath command to put in OpenStack
/devstack$ ./stack.shCloud set up will take between 30 and 40 minutes to finish relying in your web pace.
As soon as the OpenStack set up is accomplished, you must get a display just like the picture beneath.

Step 7: Accessing OpenStack through Browser
Utilizing the horizon handle, you possibly can entry OpenStack by way of your internet browser. On the OpenStack login web page, enter your username and password. You may be directed to the administration console dashboard.

You’ll be able to simply add clusters from this dashboard to extend processing functionality, customise your clusters, or take away clusters out of your OpenStack deployment.
To be taught extra about server cluster internet hosting and devoted servers, contact us at ServerMania, and we’ll assist you choose the suitable programs on your software.