
This submit is a part of our Scaling Kubernetes Collection. Register to look at stay or entry the recording.
When your cluster runs low on sources, the Cluster Autoscaler provisions a brand new node and provides it to the cluster. Should you’re already a Kubernetes consumer, you may need observed that creating and including a node to the cluster takes a number of minutes.
Throughout this time, your app can simply be overwhelmed with connections as a result of it can not scale additional.

How will you repair the lengthy ready time?
Proactive scaling, or:
- understanding how the cluster autoscaler works and maximizing its usefulness;
- utilizing Kubernetes scheduler to assign pods to a node; and
- provisioning employee nodes proactively to keep away from poor scaling.
Should you want to learn the code for this tutorial, you will discover that on the LearnK8s GitHub.
How the Cluster Autoscaler Works in Kubernetes
The Cluster Autoscaler doesn’t take a look at reminiscence or CPU availability when it triggers the autoscaling. As an alternative, the Cluster Autoscaler reacts to occasions and checks for any unschedulable pods. A pod is unschedulable when the scheduler can not discover a node that may accommodate it.
Let’s take a look at this by making a cluster.
bash
$ linode-cli lke cluster-create
 --label learnk8s
 --region eu-west
 --k8s_version 1.23
 --node_pools.rely 1
 --node_pools.kind g6-standard-2
 --node_pools.autoscaler.enabled enabled
 --node_pools.autoscaler.max 10
 --node_pools.autoscaler.min 1

$ linode-cli lke kubeconfig-view "insert cluster id right here" --text | tail +2 | base64 -d > kubeconfig
You must take note of the next particulars:
- every node has 4GB reminiscence and a pair of vCPU (i.e. `g6-standard-2`);
- there’s a single node within the cluster; and
- the cluster autoscaler is configured to develop from 1 to 10 nodes.
You’ll be able to confirm that the set up is profitable with:
bash
$ kubectl get pods -A --kubeconfig=kubeconfig
Exporting the kubeconfig file with an setting variable is often extra handy.
You are able to do so with:
bash
$ export KUBECONFIG=${PWD}/kubeconfig
$ kubectl get pods
Glorious!
Deploying an Software
Let’s deploy an utility that requires 1GB of reminiscence and 250m* of CPU.Notice: m = thousandth of a core, so 250m = 25% of the CPU
yaml
apiVersion: apps/v1
variety: Deployment
metadata:
 identify: podinfo
spec:
 replicas: 1
 selector:
   matchLabels:
     app: podinfo
 template:
   metadata:
     labels:
       app: podinfo
   spec:
     containers:
       - identify: podinfo
         picture: stefanprodan/podinfo
         ports:
           - containerPort: 9898
         sources:
           requests:
             reminiscence: 1G
             cpu: 250m
You’ll be able to submit the useful resource to the cluster with:
bash
$ kubectl apply -f podinfo.yaml
As quickly as you try this, you may discover just a few issues. First, three pods are virtually instantly working, and one is pending.

After which:
- after a couple of minutes, the autoscaler creates an additional node; and
- the fourth pod is deployed within the new node.

Why is the fourth pod not deployed within the first node? Let’s dig into allocatable sources.
Allocatable Sources in Kubernetes Nodes
Pods deployed in your Kubernetes cluster devour reminiscence, CPU, and storage sources.
Nonetheless, on the identical node, the working system and the kubelet require reminiscence and CPU.
In a Kubernetes employee node, reminiscence and CPU are divided into:
- Sources wanted to run the working system and system daemons resembling SSH, systemd, and so forth.
- Sources essential to run Kubernetes brokers such because the Kubelet, the container runtime, node drawback detector, and so forth.
- Sources accessible to Pods.
- Sources reserved for the eviction threshold.
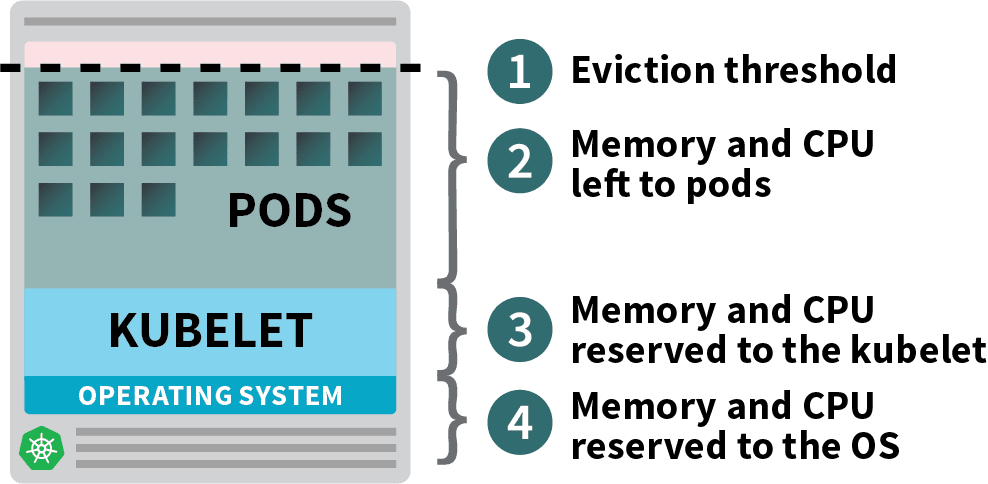
In case your cluster runs a DaemonSet resembling kube-proxy, it’s best to additional cut back the accessible reminiscence and CPU.
So let’s decrease the necessities to make it possible for all pods can match right into a single node:
yaml
apiVersion: apps/v1
variety: Deployment
metadata:
 identify: podinfo
spec:
 replicas: 4
 selector:
   matchLabels:
     app: podinfo
 template:
   metadata:
     labels:
       app: podinfo
   spec:
     containers:
       - identify: podinfo
         picture: stefanprodan/podinfo
         ports:
           - containerPort: 9898
         sources:
           requests:
             reminiscence: 0.8G # <- decrease reminiscence
             cpu: 200m    # <- decrease CPU
You’ll be able to amend the deployment with:
bash
$ kubectl apply -f podinfo.yaml
Deciding on the correct quantity of CPU and reminiscence to optimize your situations may very well be difficult. The Learnk8s instrument calculator may show you how to do that extra rapidly.
You fastened one problem, however what concerning the time it takes to create a brand new node?
Ultimately, you’ll have greater than 4 replicas. Do you actually have to attend a couple of minutes earlier than the brand new pods are created?
The brief reply is sure.
Linode has to create a digital machine from scratch, provision it, and join it to the cluster. The method may simply take greater than two minutes.
However there’s an alternate.
You possibly can proactively create already provisioned nodes if you want them.
For instance: you would configure the autoscaler to all the time have one spare node. When the pods are deployed within the spare node, the autoscaler can proactively create extra. Sadly, the autoscaler doesn’t have this built-in performance, however you possibly can simply recreate it.
You’ll be able to create a pod that has requests equal to the useful resource of the node:
yaml
apiVersion: apps/v1
variety: Deployment
metadata:
 identify: overprovisioning
spec:
 replicas: 1
 selector:
   matchLabels:
     run: overprovisioning
 template:
   metadata:
     labels:
       run: overprovisioning
   spec:
     containers:
       - identify: pause
         picture: k8s.gcr.io/pause
         sources:
           requests:
             cpu: 900m
             reminiscence: 3.8G
You’ll be able to submit the useful resource to the cluster with:
bash
kubectl apply -f placeholder.yaml
This pod does completely nothing.

It simply retains the node absolutely occupied.
The following step is to make it possible for the placeholder pod is evicted as quickly as there’s a workload that wants scaling.
For that, you should utilize a Precedence Class.
yaml
apiVersion: scheduling.k8s.io/v1
variety: PriorityClass
metadata:
 identify: overprovisioning
worth: -1
globalDefault: false
description: "Precedence class utilized by overprovisioning."
---
apiVersion: apps/v1
variety: Deployment
metadata:
 identify: overprovisioning
spec:
 replicas: 1
 selector:
   matchLabels:
     run: overprovisioning
 template:
   metadata:
     labels:
       run: overprovisioning
   spec:
     priorityClassName: overprovisioning # <--
     containers:
       - identify: pause
         picture: k8s.gcr.io/pause
         sources:
           requests:
             cpu: 900m
             reminiscence: 3.8G
And resubmit it to the cluster with:
bash
kubectl apply -f placeholder.yaml
Now the setup is full.
You may want to attend a bit for the autoscaler to create the node, however at this level , it’s best to have two nodes:
- A node with 4 pods.
- One other with a placeholder pod.
What occurs if you scale the deployment to five replicas? Will you need to look forward to the autoscaler to create a brand new node?
Let’s take a look at with:
bash
kubectl scale deployment/podinfo --replicas=5
You must observe:
- The fifth pod is created instantly, and it’s within the Operating state in lower than 10 seconds.
- The placeholder pod was evicted to create space for the pod.

After which:
- The cluster autoscaler observed the pending placeholder pod and provisioned a brand new node.
- The placeholder pod is deployed within the newly created node.
Why proactively create a single node when you would have extra?
You’ll be able to scale the placeholder pod to a number of replicas. Every reproduction will pre-provision a Kubernetes node prepared to simply accept normal workloads. Nonetheless, these nodes nonetheless rely towards your cloud invoice however sit idle and do nothing. So, you need to be cautious and never create too lots of them.
Combining the Cluster Autoscaler with the Horizontal Pod Autoscaler
To grasp this method’s implication, let’s mix the cluster autoscaler with the Horizontal Pod Autoscaler (HPA). The HPA is designed to extend the replicas in your deployments.
As your utility receives extra visitors, you would have the autoscaler modify the variety of replicas to deal with extra requests.
When the pods exhaust all accessible sources, the cluster autoscaler will set off creating a brand new node in order that the HPA can proceed creating extra replicas.
Let’s take a look at this by creating a brand new cluster:
bash
$ linode-cli lke cluster-create
 --label learnk8s-hpa
 --region eu-west
 --k8s_version 1.23
 --node_pools.rely 1
 --node_pools.kind g6-standard-2
 --node_pools.autoscaler.enabled enabled
 --node_pools.autoscaler.max 10
 --node_pools.autoscaler.min 3

$ linode-cli lke kubeconfig-view "insert cluster id right here" --text | tail +2 | base64 -d > kubeconfig-hpa
You’ll be able to confirm that the set up is profitable with:
bash
$ kubectl get pods -A --kubeconfig=kubeconfig-hpa
Exporting the kubeconfig file with an setting variable is extra handy.
You are able to do so with:
bash
$ export KUBECONFIG=${PWD}/kubeconfig-hpa
$ kubectl get pods
Glorious!
Let’s use Helm to put in Prometheus and scrape metrics from the deployments.
Yow will discover the directions on how one can set up Helm on their official web site.
bash
$ helm repo add prometheus-community https://prometheus-community.github.io/helm-charts
$ helm set up prometheus prometheus-community/prometheus
Kubernetes affords the HPA a controller to extend and reduce replicas dynamically.
Sadly, the HPA has just a few drawbacks:
- It doesn’t work out of the field. You must set up a Metrics Server to combination and expose the metrics.
- You’ll be able to’t use PromQL queries out of the field.
Thankfully, you should utilize KEDA, which extends the HPA controller with some further options (together with studying metrics from Prometheus).
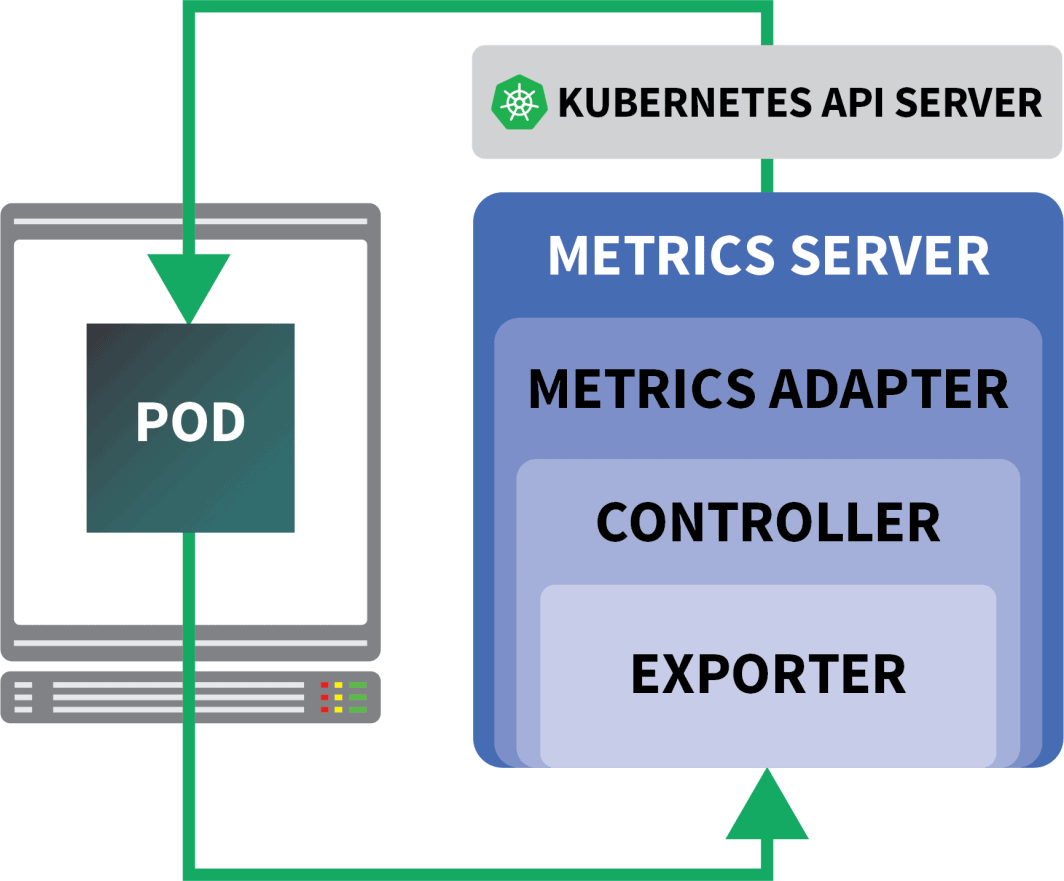
KEDA is an autoscaler manufactured from three parts:
- A Scaler
- A Metrics Adapter
- A Controller
You’ll be able to set up KEDA with Helm:
bash
$ helm repo add kedacore https://kedacore.github.io/charts
$ helm set up keda kedacore/keda
Now that Prometheus and KEDA are put in, let’s create a deployment.
For this experiment, you’ll use an app designed to deal with a set variety of requests per second.
Every pod can course of at most ten requests per second. If the pod receives the eleventh request, it’s going to depart the request pending and course of it later.
yaml
apiVersion: apps/v1
variety: Deployment
metadata:
 identify: podinfo
spec:
 replicas: 4
 selector:
   matchLabels:
     app: podinfo
 template:
   metadata:
     labels:
       app: podinfo
     annotations:
       prometheus.io/scrape: "true"
   spec:
     containers:
       - identify: podinfo
         picture: learnk8s/rate-limiter:1.0.0
         imagePullPolicy: At all times
         args: ["/app/index.js", "10"]
         ports:
           - containerPort: 8080
         sources:
           requests:
             reminiscence: 0.9G
---
apiVersion: v1
variety: Service
metadata:
 identify: podinfo
spec:
 ports:
   - port: 80
     targetPort: 8080
 selector:
   app: podinfo
You’ll be able to submit the useful resource to the cluster with:
bash
$ kubectl apply -f rate-limiter.yaml
To generate some visitors, you’ll use Locust.
The next YAML definition creates a distributed load testing cluster:
yaml
apiVersion: v1
variety: ConfigMap
metadata:
 identify: locust-script
knowledge:
 locustfile.py: |-
   from locust import HttpUser, activity, between

   class QuickstartUser(HttpUser):
       @activity
       def hello_world(self):
           self.shopper.get("/", headers={"Host": "instance.com"})
---
apiVersion: apps/v1
variety: Deployment
metadata:
 identify: locust
spec:
 selector:
   matchLabels:
     app: locust-primary
 template:
   metadata:
     labels:
       app: locust-primary
   spec:
     containers:
       - identify: locust
         picture: locustio/locust
         args: ["--master"]
         ports:
           - containerPort: 5557
             identify: comm
           - containerPort: 5558
             identify: comm-plus-1
           - containerPort: 8089
             identify: web-ui
         volumeMounts:
           - mountPath: /residence/locust
             identify: locust-script
     volumes:
       - identify: locust-script
         configMap:
           identify: locust-script
---
apiVersion: v1
variety: Service
metadata:
 identify: locust
spec:
 ports:
   - port: 5557
     identify: communication
   - port: 5558
     identify: communication-plus-1
   - port: 80
     targetPort: 8089
     identify: web-ui
 selector:
   app: locust-primary
 kind: LoadBalancer
---
apiVersion: apps/v1
variety: DaemonSet
metadata:
 identify: locust
spec:
 selector:
   matchLabels:
     app: locust-worker
 template:
   metadata:
     labels:
       app: locust-worker
   spec:
     containers:
       - identify: locust
         picture: locustio/locust
         args: ["--worker", "--master-host=locust"]
         volumeMounts:
           - mountPath: /residence/locust
             identify: locust-script
     volumes:
       - identify: locust-script
         configMap:
           identify: locust-script
You’ll be able to submit it to the cluster with:
bash
$ kubectl locust.yaml
Locust reads the next locustfile.py, which is saved in a ConfigMap:
py
from locust import HttpUser, activity, between

class QuickstartUser(HttpUser):

   @activity
   def hello_world(self):
       self.shopper.get("/")
The file doesn’t do something particular other than making a request to a URL. To hook up with the Locust dashboard, you want the IP deal with of its load balancer.
You’ll be able to retrieve it with the next command:
bash
$ kubectl get service locust -o jsonpath="{.standing.loadBalancer.ingress[0].ip}"
Open your browser and enter that IP deal with.
Glorious!
There’s one piece lacking: the Horizontal Pod Autoscaler.
The KEDA autoscaler wraps the Horizontal Autoscaler with a particular object referred to as ScaledObject.
yaml
apiVersion: keda.sh/v1alpha1
variety: ScaledObject
metadata:
identify: podinfo
spec:
scaleTargetRef:
  variety: Deployment
  identify: podinfo
minReplicaCount: 1
maxReplicaCount: 30
cooldownPeriod: 30
pollingInterval: 1
triggers:
- kind: prometheus
  metadata:
    serverAddress: http://prometheus-server
    metricName: connections_active_keda
    question: |
      sum(enhance(http_requests_total{app="podinfo"}[60s]))
    threshold: "480" # 8rps * 60s
KEDA bridges the metrics collected by Prometheus and feeds them to Kubernetes.
Lastly, it creates a Horizontal Pod Autoscaler (HPA) with these metrics.
You’ll be able to manually examine the HPA with:
bash
$ kubectl get hpa
$ kubectl describe hpa keda-hpa-podinfo
You’ll be able to submit the article with:
bash
$ kubectl apply -f scaled-object.yaml
It’s time to check if the scaling works.
Within the Locust dashboard, launch an experiment with the next settings:
The variety of replicas is rising!
Glorious! However did you discover?
After the deployment scales to eight pods, it has to attend a couple of minutes earlier than extra pods are created within the new node.
On this interval, the requests per second stagnate as a result of the present eight replicas can solely deal with ten requests every.
Let’s scale down and repeat the experiment:
bash
kubectl scale deployment/podinfo --replicas=4 # or look forward to the autoscaler to take away pods
This time, let’s overprovision the node with the placeholder pod:
yaml
apiVersion: scheduling.k8s.io/v1
variety: PriorityClass
metadata:
 identify: overprovisioning
worth: -1
globalDefault: false
description: "Precedence class utilized by overprovisioning."
---
apiVersion: apps/v1
variety: Deployment
metadata:
 identify: overprovisioning
spec:
 replicas: 1
 selector:
   matchLabels:
     run: overprovisioning
 template:
   metadata:
     labels:
       run: overprovisioning
   spec:
     priorityClassName: overprovisioning
     containers:
       - identify: pause
         picture: k8s.gcr.io/pause
         sources:
           requests:
             cpu: 900m
             reminiscence: 3.9G
You’ll be able to submit it to the cluster with:
bash
kubectl apply -f placeholder.yaml
Open the Locust dashboard and repeat the experiment with the next settings:
This time, new nodes are created within the background and the requests per second enhance with out flattening. Nice job!
Let’s recap what you realized on this submit:
- the cluster autoscaler doesn’t observe CPU or reminiscence consumption. As an alternative, it screens pending pods;
- you possibly can create a pod that makes use of the whole reminiscence and CPU accessible to provision a Kubernetes node proactively;
- Kubernetes nodes have reserved sources for kubelet, working system, and eviction threshold; and
- you possibly can mix Prometheus with KEDA to scale your pod with a PromQL question.
Wish to comply with together with our Scaling Kubernetes webinar collection? Register to get began, and be taught extra about utilizing KEDA to scale Kubernetes clusters to zero.