
MongoDB is a NoSQL non-relational in depth information database administration system utilized by a number of net functions to retailer information. It’s categorized as a complete database as a result of it’s simply scalable by including extra assets to a server (vertical scaling) or including extra servers (horizontal scaling) to a distributed system.
MongoDB shops information as JSON-like paperwork with dynamic schemas. Every MongoDB database contains collections of various paperwork, and every assortment and doc has a singular ObjectID provided by MongoDB or created by the programmer. In consequence, MongoDB does away with the fastened schemas and tables utilized in relational database administration methods.
MongoDB might duplicate information, nevertheless it delivers quicker velocity, permitting customers to entry information. It’s obtainable locally (free to make use of), enterprise (paid plans), and Atlas (cloud) variations. The MongoDB Atlas is a cloud-based service that permits builders to construct trendy functions. Builders can deploy managed cloud databases throughout a number of public cloud platforms.
How one can Set up MongoDB
You possibly can set up MongoDB on Home windows, Mac OS, or Ubuntu. As a result of MongoDB makes use of up a variety of RAM, you’re higher off working MongoDB on Ubuntu or Mac OS. The Home windows working system might compete with RAM and due to this fact decelerate the appliance.
On this tutorial, we’re going to take a look at how you can set up MongoDB on Ubuntu 20.04.
MongoDB Set up on Ubuntu 20.04
To put in MongoDB on Ubuntu 20.04, you could have an Ubuntu 20.04 server with a non-root administrative consumer and a UFW-configured firewall. You possibly can shortly receive MongoDB from Ubuntu’s official package deal repositories. Nonetheless, this repository might include an outdated model. To make sure you get the newest model of MongoDB, you could embody MongoDB’s devoted package deal repository in your APT sources. This can allow you to put in MongoDB-org, a package deal that directs to the newest MongoDB model.
MongoDB 5.0 is the newest model, with thrilling new options like time-series collections, new aggregation operators corresponding to $dateAdd, $dateSubtract, and $getField, and plenty of extra. To begin we’ll start by updating the APT package deal index and putting in the dependencies utilizing the next command line:
sudo apt replace

sudo apt set up wget curl gnupg2 software-properties-common apt-transport-https ca-certificates lsb-release
Obtain and import the general public GPG key for the newest MongoDB launch utilizing the next command:
wget -qO - https://www.mongodb.org/static/pgp/server-5.0.asc | sudo apt-key add -Alternatively, use:
curl -fsSL https://www.mongodb.org/static/pgp/server-5.0.asc|sudo gpg --dearmor -o /and so on/apt/trusted.gpg.d/mongodb.gpgThis command will return OK if the important thing was added efficiently.
Subsequent, it’s important to add the MongoDB repository by the next code:
echo "deb [ arch=amd64,arm64 ] https://repo.mongodb.org/apt/ubuntu $( lsb_release -cs)/mongodb-org/5.0 multiverse" | sudo tee /and so on/apt/sources.checklist.d/mongodb-org-5.0.checklistAfter working this command, the subsequent step is to put in the MongoDB replace packages.
sudo apt replace sudo apt set up mongodb-orgPress the ‘Y’ and ‘ENTER’ keys to just accept the set up immediate. This can set up MongoDB in your system. Nonetheless, it isn’t prepared to be used simply but. It’s a must to startup Mongo by the next command:
sudo systemctl begin mongod.serviceExamine MongoDB standing to make sure that it’s working
sudo systemctl standing mongodThe output might be one thing like this:

Afterward, allow MongoDb to startup at boot by the next command:
sudo systemctl allow mongodOnce you’re performed, you’ll be able to configure safety, allow distant entry, create Customers and Databases, assign admin roles to customers, and so on. It’s also possible to tune MongoDB to make sure optimum efficiency always.
Now that you simply’ve put in MongoDB, we’ll check out how you can configure a MongoDB cluster.
What’s a MongoDB Cluster?
A cluster refers to a group of MongoDB servers working collectively. A MongoDB cluster can confer with a “reproduction set” or a “sharded cluster.”
A number of servers carry a duplicate of the identical information in a reproduction set. A duplicate set usually consists of three nodes. One major node receives all learn and write operations from the consumer utility, and two secondary nodes shield towards failure.
If the first node fails, MongoDB routinely assigns a secondary node to exchange it, turning into the brand new major node answerable for studying and writing operations. Duplicate units assure excessive availability because the similar dataset is at all times obtainable.
A number of servers in a sharded cluster carry a fraction of the entire information, permitting for extra environment friendly efficiency and higher information storage. Mainly, a sharded cluster is a group of reproduction units; every known as a shard. When a consumer utility performs a learn/write operation, the request passes by a router that validates which shard holds the required information. The request is then despatched to the shard.
Historically, MongoDB clusters are known as sharded clusters however at the moment are used for each configurations. Sharded cluster structure permits for simple horizontal scalability.
MongoDB cluster setup
Right here, we’ll have a look at establishing a sharded MongoDB cluster. The sharded structure seems to be like this:
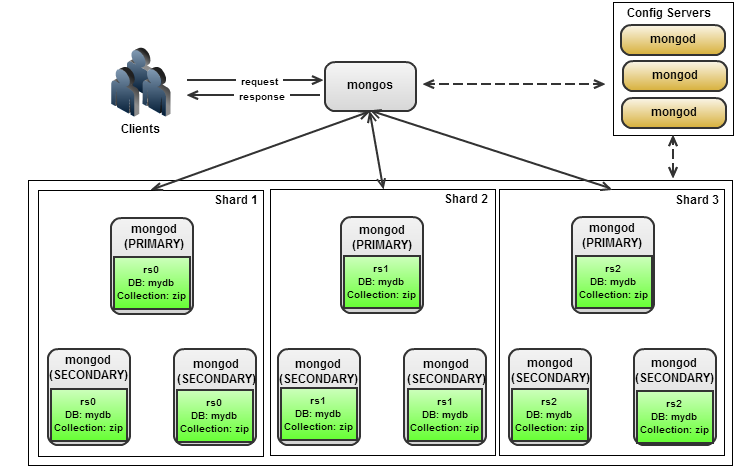
The Shard cluster structure consists of three parts.
- Shard server: The shard is a database server that consists of various reproduction units that every maintain a portion of your information. Every reproduction set or shard is answerable for some listed worth in your database.
- Question router (mongos): Mongos is a course of working on the consumer utility speaking with MongoDB. As a result of the information is distributed between totally different shards, the question should be routed to the shard that holds the requested information. It’s commonplace observe to have totally different question routers for every utility server.
- Config server: The configuration server shops metadata for the shards. Mongos communicates with the config server to determine which reproduction units to question for information. Usually, the configuration servers should include no less than three servers. They haven’t any failover functionality; if one server fails, your complete course of goes offline.
Establishing a MongoDB cluster requires that you simply run every of those parts as separate processes.
Cluster Setup Process
You’ll need a unique system to arrange every element in a manufacturing atmosphere. Nonetheless, we’ll set all processes on a single server for this function.
Step 1: Create folders to characterize the shards and config servers.
Step one is to create totally different folders. First, create three config folders for the config servers, then three shard folders for the person reproduction units. The code will look one thing like this:
mkdir cfg0 cfg1 cfg2

mkdir a0 a1 a2 b0 b1 b2 c0 c1 c2 d0 d1 d2
(every letter represents a unique shard)
Once you enter this, you’re going to get a question cursor; enter Is-1 to finish the folder setup.
Step 2: Begin the config servers
Use the next command:
mongod -- configsvr --dbpath --cfg0 --port 26050 --fork --logpath log.cfg0 --replSet cfgSince we run each course of on the identical server, it’s necessary to specify a unique port for the MongoDB situations. After establishing the primary config server, you’ll enter the same code for the remaining config servers, altering the port, dbpath, and logpath in every occasion.
In any case, the configuration servers have began, log into the primary server on port 26050:
mongo --port 26050Then provoke replication for the server utilizing:
rs.provokeThen add the remaining config servers within the replication utilizing:
> rs.add("localhost:26051")

> rs.add("localhost:26052")
We used consecutive port addresses for the totally different servers. You possibly can verify the standing of your config servers within the mongo shell utilizing;
> rs.standing()You will notice all of the three servers added with id, identify, well being, state, and so on. Then, exit the config extreme utilizing:
cfg:PRIMARY> exitStep 3: Provoke Shards
Provoke the primary shard occasion utilizing the next command:
mongod -- shardsvr --replSet a --dbpath a --port 26000 --fork --logpath log.a0Afterward, begin different situations within the reproduction set on a unique port with the suitable logpath and dbpath. Repeat the same course of for the opposite shards.
When all of the situations are up and working, begin the shard and provoke shardsvr replication.
First, log into the a0 occasion, then provoke replication:
mongo --port 26000

> rs.provoke()
Then add the opposite two servers:
a:SECONDARY> rs.add(:localhost:26001)

a:SECONDARY> rs.add(:localhost:26002)
Repeat the identical process for the b0, c0, and d0 situations, and add the reproduction units.
Step 4: Begin the Mongos occasion.
The following step is to start out the mongos. Mongo serves as an interface between the consumer and the sharded atmosphere. Begin the mongos occasion by the next line:
mongos --configdb "cfg/localhost:26050,localhost:26051,localhost:26052" --fork --logpath log.mongos1 --port 26500.We will run a number of mongos situations to extend the supply of mongos to the consumer. This might be arrange utilizing the same command however altering the logpath and port:
mongos --configdb "cfg/localhost:26050,localhost:26051,localhost:26052" --fork --logpath log.mongos2 --port 26501.Subsequent, log into the mongos occasion:
mongos --port 26500From this mongos occasion, you’ll be able to add the totally different reproduction set situations (a, b, c, d) as shards utilizing the command:
mongos> sh.addShard("a/localhost:26000")Then add the reproduction set utilizing the identical code, however imputing the first port for set b, then c, and d.
To verify the standing of your sharded atmosphere, you’ll be able to run the command:
mongos> sh.standing()It’ll present you the totally different shards a, b, c, and d and the reproduction units inside every.
Including Databases and Collections to Shards
mongos> present dbsExhibits you the obtainable databases, together with the config, mydb, and admin database. The consequence might seem like this:
admin 0.000GB
config 0.002GB
mydb 0.000GB
To shard any of those databases. For instance, to shard the mydb database, you enter the code:
mongos> sh.enableSharding("mydb")This command will add admin to the sharded databases, and you’ll see that if you enter sh.standing().
After you might have sharded the database, you’ll be able to allow sharding for the collections. The second parameter (_id:1) defines the shard key you wish to preserve for the gathering.
mongos> present collections
product
gross sales
mongos> sh.shardCollection(“mydb.saled”), (_id:1)
Once you run sh.standing, you’ll see one thing like this
mydb.gross sales
shard key: {“_id” : 1}
distinctive: false
balancing: true
chunks:
d 1
{ “_id” : { “$minkey” : 1}} –>> { “_id” : { “$minkey” : 1}} on : d Timestamp(1, 0)
The worth chunks present the partition of knowledge into chunks. From the above, we see that the information solely resides on the shard d as a result of it’s minimal. Nonetheless, as the information grows, it will likely be divided into chunks and positioned into totally different shards.
Conclusion
Right here, we have now checked out how you can arrange a MongoDB cluster on a single server. In a manufacturing cluster, every shard will reside on a unique machine, and the config server and mongos can even reside on different machines.
To be taught extra about server cluster internet hosting and database internet hosting, contact us at ServerMania, and we’ll assist you choose the suitable methods on your utility.