
Azure Information Lake Storage Gen2 relies on Azure Blob storage and gives a set of huge information analytics options. It’s quickly changing into the first alternative for corporations and builders resulting from its superior efficiency. For those who don’t perceive the idea, you may need to try our earlier article on the distinction between information lakes and information warehouses.
Information Lake Storage Gen2 combines the file system semantics, listing, file-level safety, and scale of Azure Information Lake Storage Gen1 with the low-cost, tiered storage, and excessive availability/catastrophe restoration capabilities of Azure Blob storage.
On this article, I’ll stroll you thru the method of migrating your information to information lakes.
1. Decide your preparedness
Earlier than something, it’s good to study concerning the Information Lake Storage Gen2 answer, together with its options, costs, and total design. Evaluate and distinction the capabilities of Gen1 with these of Gen2. You additionally need to get an concept of the advantages of knowledge lakes.
Look at a listing of recognized points to determine any gaps in performance. Blob storage options like diagnostic logging, entry ranges, and blob storage lifecycle administration insurance policies are supported by Gen2. Verify the present stage of help if you wish to use any of those options. Look at the present stage of Azure ecosystem help to make sure that any providers on which your options rely are supported by Gen2.
What are the variations between Gen1 and Gen2?
Information group
Gen 1 gives hierarchical namespaces with file and folder help. Gen 2 gives all of this in addition to container safety and help.
Authorization
Gen 1 makes use of ACLs for information authorization, whereas Gen 2 makes use of ACLs and Azure RBAC for information authorization.
Authentication
Gen 1 helps information authentication with Azure Lively Listing (Azure AD) managed id and repair rules, whereas Gen 2 helps information authentication with Azure AD managed id, service rules, and shared entry key.
These are the foremost variations between Gen 1 and Gen 2. Having understood these characteristic diffrenciations, when you really feel the necessity to transfer your information from Gen 1 to Gen 2, merely comply with the strategies as talked about beneath.
2. Get able to migrate
Determine the info units that you simply’ll migrate
Benefit from this opportunity to purge information units which can be not in use and migrate the actual information you want or need sooner or later. Until you need to switch your whole information directly, now’s the time to determine logical classes of knowledge that could be migrated in levels.
Carry out getting old evaluation (or equal) in your Gen1 account to find out whether or not information or folders want to stay in stock for an prolonged time period or are they changing into outdated.
Decide the influence of migration
Think about, for instance, when you can afford any downtime through the relocation. Such components may help you in figuring out migration sample and choosing the right instruments for the method.
Create a migration plan
We are able to select one among these patterns, mix them collectively, or design a customized sample of our personal.
Raise and shift sample
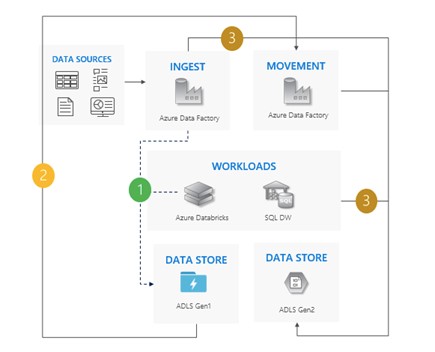
That is essentially the most primary sample.
In it, before everything, all Gen1 writes must be halted. Then, the info is transferred from Gen1 to Gen2 through the Azure Information Manufacturing unit or the Azure Portal, whichever is most popular. ACLs are copied together with the info. All enter actions and workloads are despatched to Gen2. Lastly, Gen1 is deactivated.
Incremental copy sample
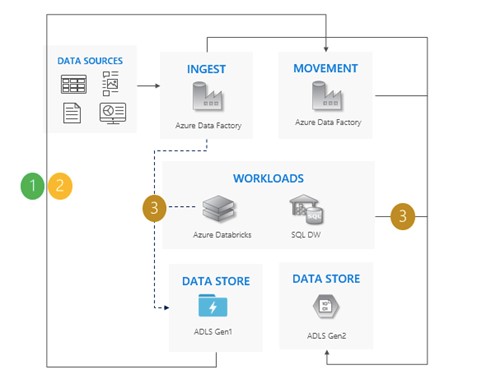
On this sample, you begin migrating information from Gen1 to Gen2 (Azure Information Manufacturing unit is extremely beneficial for this sample of migration). ACLs are copied together with the info. Then, you can begin copying new information from Gen1 in levels. When all the info has been transferred, cease all writes to Gen1 and redirect all workloads to Gen2. Lastly, Gen1 is destroyed.
Twin pipeline sample
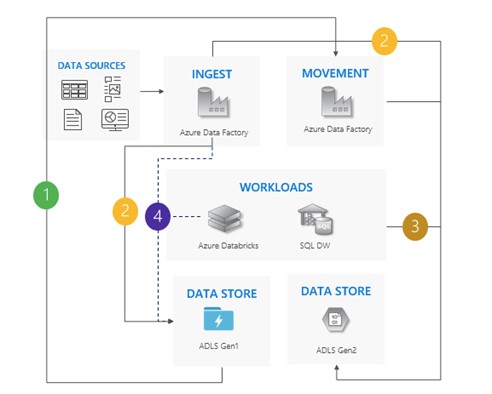
On this sample, you begin migrating information from Gen1 to Gen2 (Azure Information Manufacturing unit is extremely beneficial for twin pipeline migration). ACLs are copied together with the info. Then, you incorporate new information into each Gen1 and Gen2. When all information has been transferred, cease all writes to Gen1 and redirect all workloads to Gen2. Lastly, Gen1 is destroyed.
Bi-directional sync sample
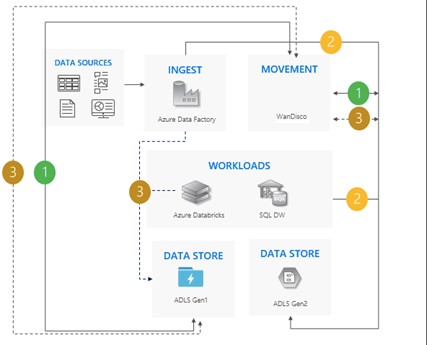
Arrange bi-directional replication between Gen1 and Gen2 (WanDisco is extremely beneficial for bi-directional sync migration). For current information, it has an information restore characteristic. Now, cease all writes to Gen1 and change off bi-directional replication as soon as all actions have been accomplished. Lastly, Gen1 is exterminated.
3. Migrate information, workloads, and purposes
Migrate information, workloads, and purposes utilizing the popular sample. We suggest that you simply take a look at circumstances in small steps.
To start, create a storage account and allow the hierarchical namespace performance. Then, transfer your information. You can too configure the providers of your workloads to level to your Gen2 endpoint.
4. Swap from Gen1 to Gen2
Whenever you’re sure that your apps and workloads can depend on Gen2, chances are you’ll begin leveraging Gen2 to fulfill your online business necessities. Decommission your Gen1 account and switch off any remaining pipes which can be operating on it.
You can too migrate your information by means of the Azure portal.
Conclusion
Whereas switching from Gen1 to gen2 may appear to be a fancy and daunting job, it brings with it a bunch of enhancements in options that you’ll enormously profit from in the long term. Take into account that the important thing query in the case of implementing this shift is asking your self how one can leverage Gen2 to fit your enterprise necessities.
I hope on this article you get a transparent rationalization of methods to migrate your information to information lake storage.