
Delivery labels might not appear to be a giant a part of working an ecommerce enterprise, however they’re important to logistics and a well-run order success course of. The absence of clear and arranged delivery labels for WooCommerce would result in supply errors and a poor expertise in your clients.
Once you solely course of a couple of orders, the way you deal with your delivery labels received’t have a big effect. However as enterprise grows, you want an efficient solution to create and handle the labels for all of your orders.
On this publish, we’ll have a look at the other ways to print delivery labels for WooCommerce orders and the steps you possibly can take to streamline the method.
Delivery labels in ecommerce
Delivery labels are an identification sticker pasted onto any package deal transported by a service. Every label comprises details about your ecommerce package deal and its contents.
The aim of the label is to relay the data wanted to information packages to the right vacation spot whereas enabling monitoring by the supply course of.
They will additionally comprise particular directions, for instance, if the package deal comprises fragile gadgets.
For the bodily label, the exact particulars and design will differ relying on the service, however the important data is just about the identical. This consists of names, addresses, weight, and the cargo barcode.
Each delivery service requires every label to stick to a exact set of necessities if they’re for use within the success course of.
Methods to print ecommerce delivery labels
There are three essential methods to create delivery labels: going straight by a delivery supplier like USPS or UPS, utilizing an ecommerce platform, or utilizing a third-party delivery and order administration answer.
Producing a delivery label by a delivery supplier
Getting the label straight by the delivery supplier is an easy course of. Nevertheless, it isn’t essentially the most environment friendly technique as there’s a honest quantity of handbook enter required.
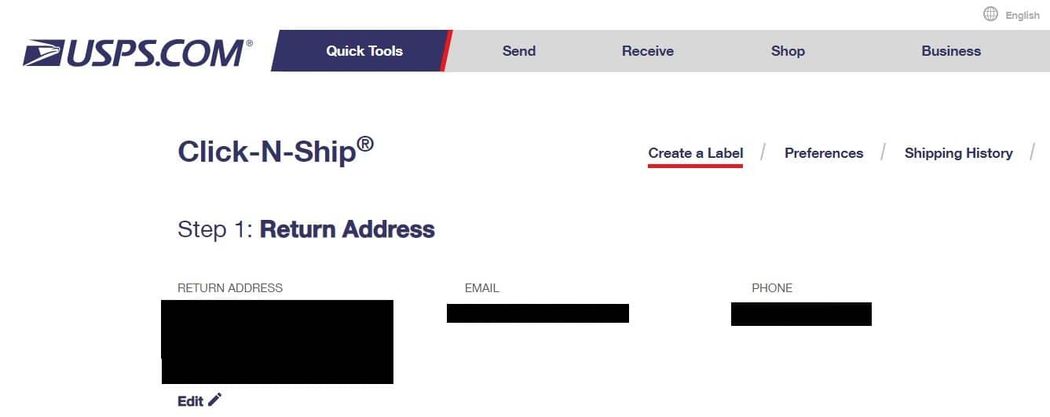
Beneath, we’ll have a look at generate a delivery label from the USPS website utilizing the Click on-N-Ship® function.
Making a USPS delivery label
First, you’ll want to supply the Return Tackle. USPS will routinely populate the handle, e mail, and cellphone quantity out of your account to make use of because the Return Tackle. If it’s worthwhile to change any of those, click on the Edit button.
Subsequent, you’ll enter the Supply Tackle. You should utilize your Tackle E book to shortly import any supply locations that you’ve beforehand used and saved. Nevertheless, should you’re delivery to a brand new location, you’ll must manually enter the handle particulars.
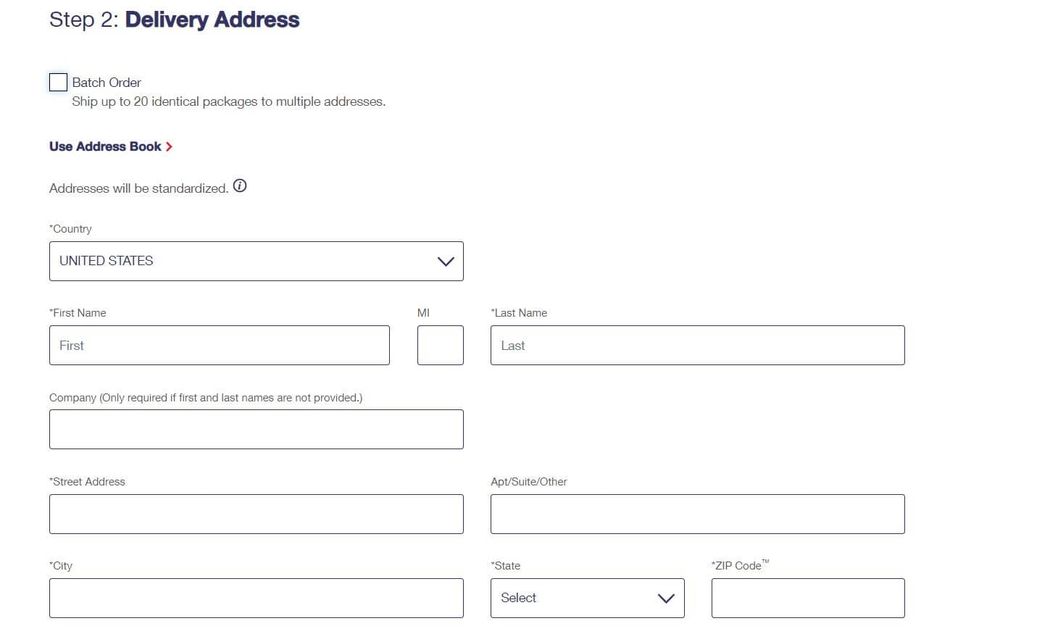
Beneath the handle fields, you’ll see the choice to ship the client an e mail notification. You’ll be able to allow this if you wish to have USPS notify them of the incoming supply.
Nevertheless, it’s a greater observe to ship your personal branded emails for transactional messages like cargo confirmations.
Once you’re carried out with the Supply Tackle, the following step is to decide on a Delivery Date. You’ll be able to decide any of the dates as much as three days from the present date.

Subsequent, you’ll enter Package deal Particulars. Begin by choosing whether or not you need to use flat price or by weight delivery. In case you select to Ship by Package deal Weight, you’ll must enter the package deal’s weight.
After that, you’ll enter the worth for the package deal.

Lastly, you’ll select your most popular Service Methodology, whether or not it’s Precedence Mail, Precedence Mail Specific, or First-Class. Click on Choose Service and Packaging after you’ve made your selection.

USPS will then take a second to calculate totally different delivery prices based mostly on the dimensions and sort of packaging that you’ll use.
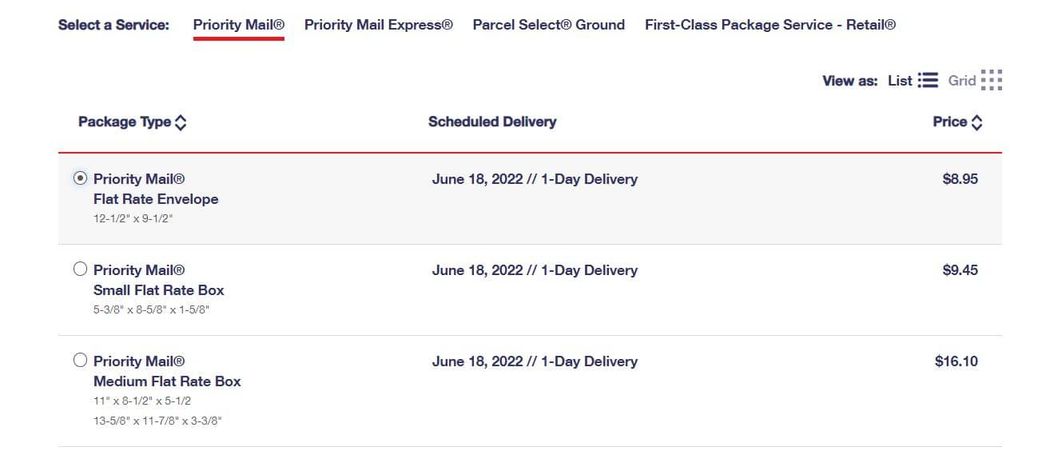
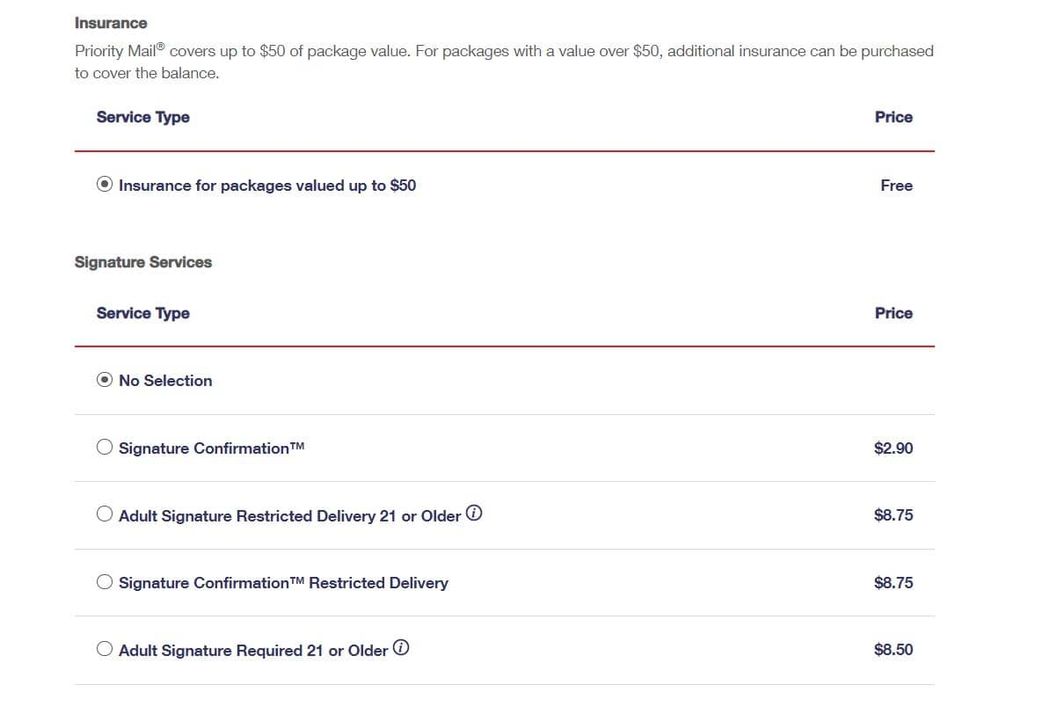
Decide the suitable Package deal Kind and scroll down the web page. There, you’ll see the choice so as to add insurance coverage for the supply. Relying on the kind of delivery you selected, this can be included free of charge.
Beneath, there are extra choices for Signature Providers. These include a small price and permit you to require that the client signal to obtain the supply.
Once you’re able to buy the label, choose Add to Cart. If you wish to purchase a number of labels at a time, you possibly can choose Add to Cart & Begin New Label to start creating one other cargo.
After you go to the cart web page and full the order, you’ll be capable to print the label from the fee affirmation web page.
Different delivery suppliers
Different standard delivery carriers present related on-line instruments that you should use to generate delivery labels for particular person orders. This consists of.
- FedEx – FedEx Ship Supervisor Lite
- UPS – Create a Cargo
- Canada Submit – Ship-in-a-Click on
- DHL – My DHL Specific (US solely)
Once more, these instruments are useful if in case you have low gross sales quantity and don’t thoughts repeatedly typing supply data.
Along with having to enter the small print for every supply, utilizing the delivery supplier’s website limits how shortly you’ll be able to print your labels. For example, with USPS you possibly can solely print 20 labels at a time.
Use an ecommerce platform
The subsequent technique is to print your delivery labels out of your ecommerce platform. This comes with many benefits as your ecommerce website will have already got the supply data.
The platform can routinely populate particulars just like the buyer’s handle and the product weight so that you simply don’t must manually do it with every order.
Automating this course of can prevent a substantial period of time particularly as your retailer grows and it’s worthwhile to fulfill numerous orders.
Use a third-party delivery software program
The ultimate solution to print your delivery labels is to make use of a delivery software program like Ordoro or Clickpost. These instruments combine with main delivery carriers in an effort to generate, print, and handle your labels from a single place. In addition they join with ecommerce platforms, permitting you to sync your order data to assist automate the label creation course of.
Printing delivery labels from WooCommerce
WooCommerce Delivery
WooCommerce Delivery is a free extension constructed straight into the WooCommerce platform. With it, you possibly can streamline the method of producing and printing delivery labels straight out of your WooCommerce dashboard.
With WooCommerce Delivery, you get discounted charges for standard carriers, and the extension additionally integrates with the USPS Delivery Methodology extension. You should utilize this to routinely calculate the delivery charges for orders despatched through USPS.
To obtain the extension go to WooCommerce > Extensions. From there, discover and choose WooCommerce Delivery. This can take you to the plugin’s web site. Add the plugin to your cart and full the free checkout.
On the thanks web page, click on the Add to Website Button.

The next web page will present a listing of WordPress websites linked to the WooCommerce account used to finish the order. Click on the tab in your website. In case you don’t see your website, you possibly can join it by clicking the Add a brand new website button.
After you choose your website, the web page will take a second to finish the set up and activation course of. Alternatively, you’ve got the choice to obtain the extension from the thanks web page. After getting the file, you possibly can then add it to WordPress manually.
Join Jetpack
Subsequent, you’ll want to put in and Jetpack (should you haven’t already) to have the ability to use the automated label printing. Upon activating the extension, it is best to see a banner notification asking you to put in Jetpack.

Click on the button to put in Jetpack and full the steps to get your account arrange. As soon as Jetpack is energetic, the WooCommerce Delivery extension might be absolutely useful. You’ll be able to then begin creating labels in your WooCommerce orders.
Making a delivery label with WooCommerce Delivery
Begin by going to your Orders web page out of your WordPress dashboard. Discover and click on on the order that you simply need to print a delivery label. On the order element web page, you’ll see a bit indicating that an merchandise must be fulfilled. Click on Create delivery label.

To your first label, you’ll must enter your origin handle (the handle the place you’re delivery from). With future labels, this worth might be populated for you routinely.

Subsequent, comes the Vacation spot handle. The plugin will add this routinely based mostly on the delivery handle given by the client. In case you’ve edited the handle for any purpose within the order editor, the plugin will ask you to sort it in once more.
After you’ve offered the addresses, you’ll see an choice to confirm them. With this, the plugin will run the addresses in opposition to official handle knowledge to see if the formatting and particulars are appropriate. If you would like, you possibly can skip this verification and easily use the handle as entered.
The subsequent part of the shape is the place you’ll select your package deal sort. You’ll see choices for traditional packaging from carriers like USPS and DHL in addition to the choice so as to add a customized package deal with your personal sizing.
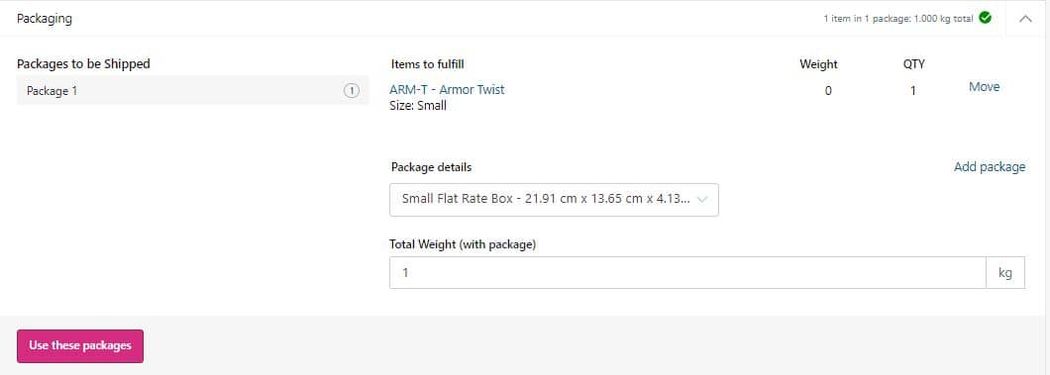
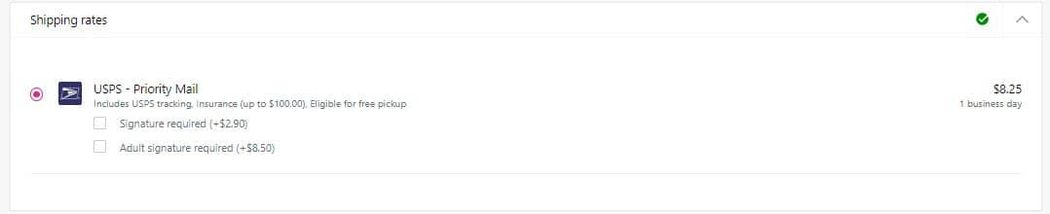
After you choose the package deal particulars, enter the full weight for the cargo and choose Use these packages. The plugin will then routinely calculate the delivery price.
Now, you’re prepared to purchase the label. You probably have added any funds to your WordPress account, you’ll see them listed beneath the order whole. If not, there might be a button so as to add a card to your account.
Once you’re prepared, click on Purchase delivery labels. After the fee is processed, a window will seem so that you can view and print the delivery label. Or, it can save you the label to batch print it with different orders.
ELEX EasyPost
ELEX EasyPost is one other WordPress plugin able to offering delivery charges and producing delivery labels in your WooCommerce orders. It may well additionally show real-time charges in your cart and checkout pages and clients can use it to trace their deliveries from their account.
With ELEX EasyPost put in, you possibly can create new shipments and labels by clicking Create cargo button on the precise facet of the Edit order web page. There are alternatives to pick the package deal measurement and delivery service earlier than routinely calculating charges and producing labels.
When you finalize a cargo, the small print are routinely pushed to your EasyPost which can pay the postage whereas the label is generated so that you can print straight from WordPress.
Cargo labels and monitoring data
Delivery carriers monitor each package deal so monitoring data is a pure a part of the delivery label. That is true whether or not you create the label by the service website or should you do it straight from WooCommerce.
Nevertheless, there’s a distinction in how the monitoring particulars are communicated along with your clients.
In case you generate your labels utilizing the service’s instrument, you’ll must manually get the monitoring particulars from the service after which e mail them to the client.
A bit of earlier we famous an choice to e mail the recipient a notification within the USPS create a cargo instrument — however once more, this generic message received’t come from you or embody your branding.
Alternatively, producing your labels by your platform makes it simpler to go monitoring particulars on to clients. For the reason that platform already is aware of the client’s e mail handle and may retailer and ship monitoring data to clients, fewer steps are wanted when you generate the label.
Closing ideas on delivery labels for WooCommerce
When you’ve got a enterprise to run, you don’t need to waste pointless time printing labels in your deliveries. This information will make it easier to generate your WooCommerce delivery labels extra effectively — so you possibly can give attention to successful new clients.